RabbitMQ with SpringBoot and Openshift
Hello, fellow Devs and architects
I am back to writing tech stuff and planned to do it with no bigger gaps hereafter

So in this article, I will explain how to setup the RabbitMQ with our Springboot application. I have used the Openshift for the deployment portion. This article will be covering both the stages and how to setup them
Set Up with the Spring Boot
For setting up with the Springboot., I have added the following to the Pom.xml file
<dependency>
    <groupId>org.springframework.boot</groupId>
    <artifactId>spring-boot-starter-amqp</artifactId>
    <version>3.1.5</version>
</dependency>
This Spring AQMP helped me to progress with the connections of the RabbbitMQ. Seriously Spring has a good characteristic of writing documentation for everything. Then we have to write configurations to the rabbitMQ setup.
spring.rabbitmq.host=rabbitmq
spring.rabbitmq.port=5672
spring.rabbitmq.username=my_env
spring.rabbitmq.password=abcd
With this we have completed the spring side setup., With the later sections we will explore writing the code with Springboot
Working With RabbitMq Locally
If you need to work on RabbitMQ locally without port forwarding, please use podman/docker with the commands
Assuming your podman machine has already started
podman pull rabbitmq:3-management
podman images
copy the image id and then use the command to run the container
podman run -d — name my-rabbitmq2 -p 5672:5672 -p 15672:15672 a4e86f36e8fd
Then run it with the container id
podman start 81bc67542164
To check if the container is running use
podman ps
With this we have setup the local rabbitMQ running on our port 15672 and listening to active requests on port 5672.
Now that we have made these setups.., Lets go to the simpler steps
Putting Listeners and Producers
Typically., I have created a config class with 3 beans
Bean 1: This is the main queue name to which all the tasks are processed
Bean 2: This is an Exchange that carries out the transmission
Bean 3: This is infact the main bridge that connects the bean 1 and bean 2
@Bean
 Queue msgQueue() {
 return new Queue("msgQueue", true);
 }
@Bean
 DirectExchange Exchange() {
 return new DirectExchange("msgExchange");
 }
@Bean
 Binding cw1Binding(Queue msgQueue, DirectExchange msgExchange) {
 return BindingBuilder.bind(msgQueue).to(msgExchange).with("CW1Routing");
 }
I have used the direct exchange, which in turn is the default exchange available.
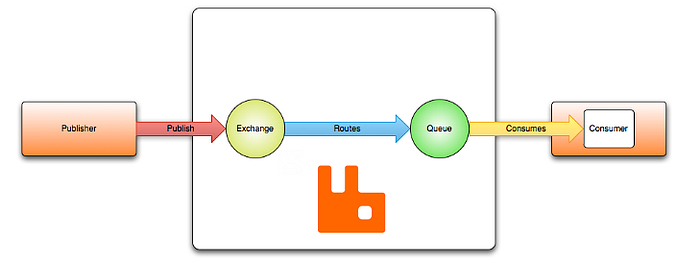
We can create n number of queues, routing, binding combinations for our api :)
Setting up a listener
In order to setup a listener., We have to annotate the method that which listener it comes under and what is the concurrency that is needed for it
@RabbitListener(queues = "msgQueue", concurrency = "3")
public void receiveMessage(List<File> message) throws IOException {
    logger.info("Received message: " + message + " at " + LocalDateTime.now());
}
The Queue logs the message whenever it receives a message, So what about our Producer
Setting up a Producer
Autowire the RabbitTemplate to the class you’re working with and then from any method we have to pass this to send out our message
rabbitTemplate.convertAndSend("msgExchange","msgRouting",msgContent); //message emitted to the CW1Listener classWith this our messages are emitted to the Queue and then processed by our listener
Cheeks., now that the coding is done., It works good in our local environment
Working with Openshift
This is a simple step considering the things we did earlier
I had a project earlier setup in openshift and I switched to the project using oc commands then do the following
- oc get pods
Find the exact microservice you’re working with.
To create and expose the RabbitMQ, please follow these steps
- oc new-app rabbitmq:3-management
- oc expose service/rabbitmq
- oc get route rabbitmq
Once these steps are done., then go to the console of OS and then you should be able to see the rabbitmq under deployments section.
Please edit the YAML and add additional storage if you think the pods are not scaling up
That’s it folks., Now your Openshift setup is done
One final thing.,In the springboot application properties use the username and password as given in the YAML of the RabbitMQ deployment.
Port Forwarding and working with the deployed content will be made as another small article soon.
Some useful articles for reference: